Ant & Anise

Simple, elegant, healthy food and a fondness for gluten- and grain-free recipes

Navigation
  • Home
  • Recipes

Easy candied orange peel

candied orange peel coated in fine sugar

When December rolls around, you can count on me to first start thinking of what holiday treats I’ll be creating. Shortbread is a given, both sweet and savory. Fruitcake (yes!). Something chocolate, whether that’s a dark flourless cookie or almond roca bars, or – in rare years – chocolate fudge. And candied orange peel.

It’s one of my go-to holiday treats. For years it was grapefruit instead of orange, but I’ve come around to enjoying the orange peel more. So many reasons to love this recipe. It’s…

  • sweet but not heavy like so many holiday treats
  • easy to make
  • a fantastic gift from your kitchen
  • vegan, gluten free and nut free

So unless someone in your circles is staying away from sugar, it’s got a wide appeal.

Pun intended, Bob šŸ˜‰

naval oranges for candied peel

Start by slicing the peel into even segments, then bring them to a boil in a saucepan a few times to remove any bitterness.

candied orange peel in pot after boiling

Simmer in a sugar syrup until the peel is tender and glistening, then move to a parchment-lined baking sheet to dry. Once the peel is almost dry, finish it off by rolling in superfine sugar.

candied orange peel drying on parchment

And that’s it. Simple. Amazingly tasty. And just in time for Christmas. Enjoy!

Print
Easy candied orange peel

Yield: 144 pieces

An easy treat for the holidays, and a welcome counterpoint to the heavy butter-laden cookies and tarts on your dessert tray. Naturally vegan and gluten free too.

Ingredients

  • 3 medium naval oranges
  • 1 cup granulated sugar
  • 1/2 cup water
  • 1/2 cup superfine (berry) sugar, for coating

Instructions

  1. Line two large baking trays with parchment paper and set aside.
  2. Wash and dry the oranges, and trim the ends off.
  3. With each orange, cut the peel through to the fruit in quarters. Gently separate the peel from the orange with your fingers. Reserve the orange for another use.
  4. You should now have 12 pieces of orange peel (four from each orange). Evenly cut each piece into 12 pieces.
  5. Place the peel in a medium saucepan and cover with cold water. Bring to a boil over medium heat. Boil one minute and drain. Return the peel to the saucepan and repeat this step three more times to remove the bitterness from the peel.
  6. Return the peel to the saucepan, cover with cold water, bring to a boil and simmer for 10 minutes. Drain the peel.
  7. Heat granulated sugar and water in the saucepan over medium heat, stirring until the sugar dissolves. Add the peel and boil gently in the syrup, stirring to ensure the syrup evenly coats the peel.
  8. When the syrup has mostly absorbed into the peel (10-15 minutes), remove from heat and place the peel in separate pieces on the parchment-lined baking sheets. Let dry, uncovered, at room temperature for 8 hours or overnight.
  9. After the peel has dried, toss a few pieces at a time in a small bowl with the superfine sugar, shaking any excess sugar off. Place sugar-coated peel on parchment-lined baking tray for a few hours.
  10. Transfer the peel to an airtight container.
3.1
Copyright 2011-2013 Ant & Anise

Micro-Batch Blackberry-Lime Jam

microbatch blackberry jam

I love making jam.

It triggers one of the happiest memories of my childhood, August days spent on big blackberry picking parties with the Sheens, family friends from Mom and Dad’s Alberta days. Jack Sheen and Dad went at the bushes with clippers and ladders. The seven of us kids looped our buckets into our belts for two-handed picking. And Mom and Grace provided the picnic lunch, which always included chocolate cake, ā€œfor the men,ā€ Mom said, but I doubt they enjoyed it any more than we did.

As years went by, I kept on making jam. I’d pick enough berries for a batch or two, mash and measure them, then freeze them. When we ran out of jam, I’d pull the berries out of the freezer, and, following Mom’s lead, cook up enough for seven good sized jars.

That worked well for a long time, but it doesn’t any more. We eat less added sugar, and less bread. Last year I picked raspberries and put berries for two batches in the freezer, measured and ready to go. They’re still there.

I have, however, found a way to satisfy my jam making urges: the micro-batch.

microbatch peach jam

I made the first one last summer, after arriving on Read Island with no jam, and a peach and several apricots rapidly heading towards rot. Read Island is the one place where breakfast always includes toast, which always requires jam. IĀ  pulled out the Joy of Cooking, read through the recipes and then struck out on my own.

Here’s the pattern: 2 cups of crushed fruit, 1.5 cups of sugar (much less than in a traditional batch, where the sugar is almost double the volume of the fruit) and whatever extra flavoring you might want to toss in. No pectin required and not much time. And because the quantities are so small, you have more freedom to play around with flavors.

First time around I added some chopped dried apricots that I found at the back of the cupboard. My second micro-batch jam came from two cups of strawberries that were rapidly approaching their best-before date. Two tablespoons of orange liqueur improved them immensely.

microbatchjuicer

But the best jam of all has to be blackberry lime: straight up blackberry jam with lime juice and zest squeezed in when the cooking’s finished.

If, like me, you like to re-use Bonne Maman jam jars, you’ll get one full jar with some left over. Standard 1-cup canning jars should give you two full jars.

Print
Blackberry and Lime Micro-Batch Jam

Ingredients

  • 2 cups crushed blackberries
  • 1 1/2 cups sugar
  • Zest of 1/2 lime
  • 2 tablespoons lime juice (about 1/2 lime)

Instructions

  1. Combine berries and sugar in a two-quart saucepan. Stir over medium heat until the sugar dissolves.
  2. Raise the heat to high and bring the berries to a full rolling boil for one minute. You can skim the foam from the top if you like.
  3. Reduce the heat to a simmer and cook until the jam is as set as you would like it to be, about 20 minutes.
  4. Test for jelling by dropping a teaspoon of jam on a saucer, then tipping the saucer. If the jam moves slowly, and starts to set as it runs down the saucer, it's cooked. You can also check that you spoon leaves a track on the bottom of the pan.
  5. Remove the pan from heat, and stir in the lime juice.
  6. Pour the jam into whatever heatproof container you've chosen.
  7. If you're using a standard jam jar, you'll have about half a cup of jam left over for another container.
  8. Makes about 2 cups jam.
3.1
Copyright 2011-2013 Ant & Anise


Grilled peaches, memories of Okanagan holidays and hanging onto summer

grilled peaches fig balsamic glaze

The last day of August. How did this month fly by so quickly? It seems only last week I was waking up, day after day, to bright sunshine that would warm up to make another spectacular day. The long, hot days in July and most of this month blurred together bike rides around the seawall, trips to Granville Island market, and Sam the (fair weather) cat only too happy to spend all day and all night outside sleeping in the garden.

One of the things I love about summer is the relaxed pace, the meandering of different schedules that aren’t as rigid as they are any other time of year. It means there’s a chance that best friends, who we haven’t had over in months, can make it over for dinner with only a few days’ notice. (It helps they have a daughter who, at 12, is a qualified babysitter only too eager to left alone with her younger sister for an evening.)

What better way to celebrate summer than with a dinner for friends that enlists the grill in every course, from appetizer (chicken satay) to main course (fresh halibut) to dessert? Yes, dessert. I’m talking grilled peaches…. 

Read More »

Oven dried apples and pears

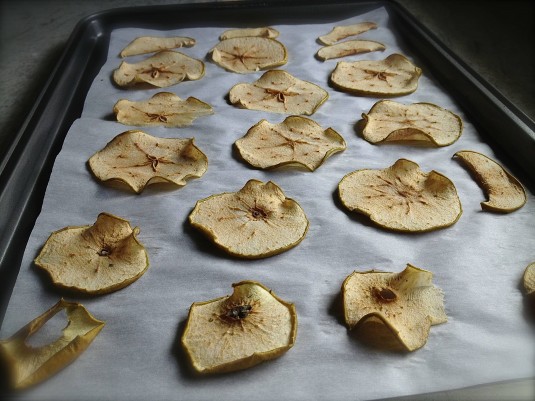
oven dried apple slices

When we were talking on Saturday, you mentioned that meditating for only a few minutes a day can help increase grey matter in your brain. I know it’s a good practice, but I’ve found it challenging to sustain it daily. Your comment got me thinking again.

First, that I will try, again, to build meditation into my day. Every day. (I started on Sunday morning with 7 minutes and am up to 10 already. Yay! This TEDx video is adding to my motivation.)

It also made me think that small investments in time can often yield benefits that endure. I thought of getting together with good friends, or exercising for just half an hour. Both of those make me feel better and last well beyond the actual time spent.

Oven drying apples and pears is the same: A little effort goes a long way and gives a generous result. (Rather like the slow roasted tomatoes you introduced me to.)

oven dried pear slices

The oven drying takes just under an hour, plus a few more hours to completely dry. Mostly it’s not active time, just a matter of being around so you can keep an eye on the fruit slices while they’re in the oven.

And what you get are compact slices of amped-up apple and pear, concentrated flavor in a sweet, chewy bite. Delish.

They can be used a number of ways. So far I’ve tossed them on top of green salads and stirred them into hot cereal. (The cereal was particularly good.) They would jazz up a cheese plate, particularly if a cambozola or roquefort were involved. And I bet they would be heavenly dipped in some dark chocolate. Oh yes, dried pear and chocolate. Now that’s a thought I can meditate on.

pear and apple slices

Recipe Tip: You’ll find a number of techniques for drying pears and apples – like soaking the fruit in water with lemon juice added, using a greased pan or oiled oven rack to place the fruit on. What I found worked best is an extremely simple approach, with no oil or lemon involved. Here are my suggestions:

  • Use firm fruit. It’s easier to get the slices thin and produced a better (drier) result. I used a Granny Smith apple and both Bartlett and Bosc pears.
  • If your slices are thin enough, you won’t need to brush them with lemon juice or soak in a water/lemon juice solution. (I brushed half of the pear slices with lemon juice but couldn’t see any difference with the plain ones once they were dried.)
  • Unless you’re particularly seed averse, don’t bother coring the fruit. Leaving the seeds in is easier, and they look quite pretty.
  • Use parchment-lined baking sheets, and place the slices directly on the parchment – no oil required.

oven dried apple slices

Print
Oven dried apples and pears

Ingredients

  • 1 crisp apple and 1 firm pear

Instructions

  1. Preheat oven to 200°F. Line a large baking sheet with parchment paper.
  2. Slice the apple and pear crosswise into thin slices, about 1/8ā€ thick. If you have a mandoline this is a good time to enlist it. If you don’t (or if it’s in storage like mine is) use a sharp chef’s knife.
  3. Place the slices evenly on the parchment-lined baking sheet and place in the oven. Let the slices dry for about 45-60 minutes. It’s a good idea to check them at the 45-minute mark, as the thinner slices will start to get toasty brown then.
  4. Remove the baking sheets from the oven and let them cool for 5-10 minutes. Carefully peel the slices from the parchment, and transfer to a cooling rack to finish drying. This may take a few hours. Store in an airtight container for up to a week.
3.1
Copyright 2011-2013 Ant & Anise


An upside-up torte: welcome back

peargingertorte4 I can’t imagine a better reason to stop blogging than moving house. What could be more disruptive? But it’s great to have you so much closer, only 10 minutes away instead of an hour.

All it took for me to stop blogging was theĀ beginning of the fall yoga session and getting the outside of the house painted and repaired while the sunshine lasted. September was noisy, messy, and complicated by schedules that hinged on class times and when someone could be home for the painter and carpenter. Oddly, out of all that, I found my own comfort dessert: an upside-up torte to match your upside-down cake.

Just after Thanksgiving weekend, Kevan, the painter, brought a bag of prune plums from his place on Gabriola Island. I love prune plums, and think of them as one of the consolations of fall. I used to make plum crisps, and I still keep a bottle of Slivovitz, Polish plum brandy, in the liquor cabinet, to macerate the fruit with, just in case. But I’m off crisps at the moment. Just between us, they bore me.

So I went looking for a prune plum dessert, and found a very simple torte, which, like your upside-down cake, is infinitely variable.Once I followed an online suggestion and added more plums, inserted sideways instead of place face down. It came close to doubling the number of plums, and reversed the ratio of fruit to batter. Excellent!

Next I made it with some grapes from a friend’s vines, a little sour for eating, but surprisingly good in a torte. And then last Saturday we made the pear and ginger version: four Bartlett pears, sliced thin, the slices inserted vertically into the batter, the top scattered with a generous amount of thinly sliced candied ginger.

It’s the perfect homey dessert recipe: based on fruit, quick and easy, and so simple you can put it together from memory. It can adapt to any season: a peach or berry torte in the summer, a pink grapefruit torte, or even a banana torte in the depths of winter. For bonus points, it freezes well. If you happen to have a glut of fruit, you could make two or three, and bring them out later in the fall.

I so understand baking as a psychic anchor. My Mom baked all the time – odd that your Mom didn’t. There’s somethingĀ  sunny and uplifting about flour, sugar, butter and eggs. You get to create an edible, often beautiful, treat. It has a moment of glory, and then it’s eaten and disappears: joy to minimalists everywhere.

peargingertortebefore2

Print
Pear-Ginger Torte

Serving Size: 6-8 people

I found this recipe, originally from Marian Burros’s Elegant But Easy cookbook, on Epicurious. It’s worth looking at the link for the story of the recipe, and for the helpful reader comments. I’m reprinting the recipe here for the pear and ginger topping, and to correct what may be a typo in the original. It calls for an ungreased pan. That’s not a good idea. Grease it.

Ingredients

  • 3/4 cup sugar
  • 1/2 cup butter
  • 1 cup unbleached all-purpose flour, sifted
  • 1 teaspoon baking powder
  • 2 eggs
  • Pinch salt
  • 4 medium-sized ripe pears, sliced thin
  • 2 to 4 tablespoons candied ginger, sliced thin
  • Whipping cream or ice cream, optional

Instructions

  1. Arrange a rack in the lower third of the oven. Preheat the oven to 350°F.
  2. In an electric mixer, cream the sugar and butter. Add the flour, baking powder, eggs, and salt and beat to mix well.
  3. Place in a 9-inch greased springform pan. Cover the top with the pear slices, arranged vertically, pushing them down into the batter. Scatter the candied ginger over the pears.
  4. Bake for 40 to 50 minutes, until the center tests done with a toothpick. Remove and cool to room temperature or serve warm.
  5. Serve plain or with whipped or ice cream.
3.1
Copyright 2011-2013 Ant & Anise

Pear ginger upside-down cake

I’m blaming it on the move. The lack of posts lately, that is. To say it’s been hectic around here the last month is an understatement.

Moving house is one of those well-known stressful life events. And ours wasn’t just a move but a downsizing. I’m not sure, but my guess is that this ups the stress score a few notches.

In addition to the long list of regular moving tasks, with a downsizing there’s a number of questions that need answers before moving day: What is essential to take with us? Will our huge, well-loved sofa fit in the door? What can we shed rather than move into storage? And one question I pondered a lot: If it’s going into storage, won’t we realize in a year that we can get along without it just fine? That’s the minimalist in me talking.

With all the long days of making moving-related decisions, it suddenly hit me: With my regular life temporarily turned upside-down, I really needed a few stable things to count on. Anchors to help keep me sane amidst all the changes swirling around us.

… 

Read More »

  • 1
  • 2
  • 3
  • Next Page »
  • Facebook
  • Instagram
  • Pinterest
  • Twitter

About Us

We’re Eve and Kris, an aunt and a niece. We love food. And while we have a lot in common in our approach, we also have our differences. So why not hash it out in a blog? Ant and Anise is a conversation about food in our lives, past and present. We like real food that doesn't take hours to prepare, but has something unexpected about it. It helps if it's pretty, too.

Subscribe to Ant & Anise!

Search

recent posts

  • Easy candied orange peel
  • Roasted kabocha squash dip
  • Squash and apple soup
  • Micro-Batch Blackberry-Lime Jam
  • Cauliflower Cheese Bake
  • Tarragon Pesto
  • Cheer for ginger cookies
  • White Bean Chili with Prawns

© Copyright 2014 Ant and Anise · All Rights Reserved · Built On The Genesis Framework · Powered By Wordpress


Loading Comments...