Ant & Anise

Simple, elegant, healthy food and a fondness for gluten- and grain-free recipes

Navigation
  • Home
  • Recipes

Oven dried apples and pears

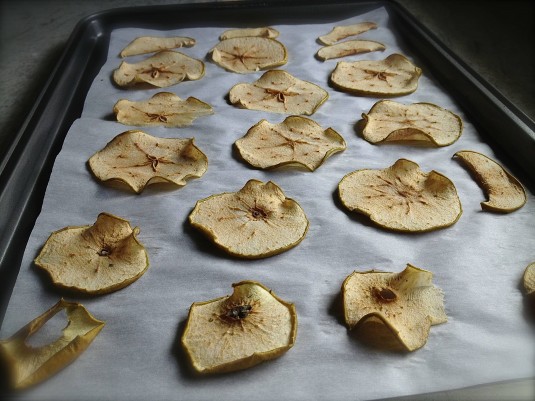
oven dried apple slices

When we were talking on Saturday, you mentioned that meditating for only a few minutes a day can help increase grey matter in your brain. I know it’s a good practice, but I’ve found it challenging to sustain it daily. Your comment got me thinking again.

First, that I will try, again, to build meditation into my day. Every day. (I started on Sunday morning with 7 minutes and am up to 10 already. Yay! This TEDx video is adding to my motivation.)

It also made me think that small investments in time can often yield benefits that endure. I thought of getting together with good friends, or exercising for just half an hour. Both of those make me feel better and last well beyond the actual time spent.

Oven drying apples and pears is the same: A little effort goes a long way and gives a generous result. (Rather like the slow roasted tomatoes you introduced me to.)

oven dried pear slices

The oven drying takes just under an hour, plus a few more hours to completely dry. Mostly it’s not active time, just a matter of being around so you can keep an eye on the fruit slices while they’re in the oven.

And what you get are compact slices of amped-up apple and pear, concentrated flavor in a sweet, chewy bite. Delish.

They can be used a number of ways. So far I’ve tossed them on top of green salads and stirred them into hot cereal. (The cereal was particularly good.) They would jazz up a cheese plate, particularly if a cambozola or roquefort were involved. And I bet they would be heavenly dipped in some dark chocolate. Oh yes, dried pear and chocolate. Now that’s a thought I can meditate on.

pear and apple slices

Recipe Tip: You’ll find a number of techniques for drying pears and apples – like soaking the fruit in water with lemon juice added, using a greased pan or oiled oven rack to place the fruit on. What I found worked best is an extremely simple approach, with no oil or lemon involved. Here are my suggestions:

  • Use firm fruit. It’s easier to get the slices thin and produced a better (drier) result. I used a Granny Smith apple and both Bartlett and Bosc pears.
  • If your slices are thin enough, you won’t need to brush them with lemon juice or soak in a water/lemon juice solution. (I brushed half of the pear slices with lemon juice but couldn’t see any difference with the plain ones once they were dried.)
  • Unless you’re particularly seed averse, don’t bother coring the fruit. Leaving the seeds in is easier, and they look quite pretty.
  • Use parchment-lined baking sheets, and place the slices directly on the parchment – no oil required.

oven dried apple slices

Print
Oven dried apples and pears

Ingredients

  • 1 crisp apple and 1 firm pear

Instructions

  1. Preheat oven to 200°F. Line a large baking sheet with parchment paper.
  2. Slice the apple and pear crosswise into thin slices, about 1/8” thick. If you have a mandoline this is a good time to enlist it. If you don’t (or if it’s in storage like mine is) use a sharp chef’s knife.
  3. Place the slices evenly on the parchment-lined baking sheet and place in the oven. Let the slices dry for about 45-60 minutes. It’s a good idea to check them at the 45-minute mark, as the thinner slices will start to get toasty brown then.
  4. Remove the baking sheets from the oven and let them cool for 5-10 minutes. Carefully peel the slices from the parchment, and transfer to a cooling rack to finish drying. This may take a few hours. Store in an airtight container for up to a week.
3.1
Copyright 2011-2013 Ant & Anise


Mini Chocolate Blackberry Cupcakes

chocolate blackberry cupcakes

It’s funny, the way we do family birthdays. The ones that fall outside of October, that is.

Between Christmas and August it seems impossible to get us all together to celebrate individual birthdays, one each in January, March and May and two in July. We’ve tried numerous times, but our schedules don’t mesh very well. And having Bob out of town on business so frequently these days doesn’t help either.

A late summer party to exchange gifts and belated birthday cards seems to work. There’s a small window of opportunity, around the third week of August, after you and Alan return from vacation and before Janet and Jenny head off in early September. By this time, there’s usually been enough warm weather and lazy summer days so we’re all relaxed, to some extent, along with more relaxed summer schedules.

After spending the day in the kitchen chopping, roasting and making vinaigrettes, I was happy to enlist some help to assemble the appetizers — Alana with the smoked salmon canapes and you with the melon pieces wrapped with prosciutto. We don’t hang out too often in the kitchen together, but it’s always interesting to compare how we’d tackle things.

Like the prosciutto wrapped melon. If it were you, you would have put the ingredients on a plate so your guests could assemble their own appetizers. The pieces of melon are so small, you want me to wrap each one?

Yes, Eve. (Tee hee hee.)

It’s true, making individual bites of prosciutto-wrapped melon is more labor intensive. But I like them that way. I think it’s partly because I like to be on the receiving end of perfect bite-sized canapés. It’s like you’re at a posh cocktail party, you know?

It could be my Dad’s side of the family coming out in me too. I can remember his mother taking a lot of care and attention to assemble a fruit platter for a party, fussing to make sure the watermelon slices were all evenly spaced in a fan shape and fretting a little when they would slide out of order.

To complement your rustic peach blackberry galette for dessert, I made chocolate blackberry cupcakes. Mini sized ones. (There’s that labor intensiveness again. But they’re so cute. And bite sized!) A blackberry in the bottom of each cup, rich chocolatey cake and a Swiss meringue buttercream, lightly flavored and colored with juice from fresh blackberries that I squished through a fine mesh strainer.

It was so good to get everyone together at last. We bundled up to eat outside, and I was thankful we had the outdoor heater going. When the light faded so quickly after dinner we ate dessert in the pitch black, except for the glow of the candles. The stories, laughs and bites of blackberry galette and cupcakes made me think this is just what a late summer barbecue should be like. Happy Birthday, Bob, Eve, Jenny, Alan and Dad. Thanks to Janet, Brittne, Alana and Mike for helping make the night a special one.

chocolate blackberry cupcakes

Print
Mini Chocolate Blackberry Cupcakes with Blackberry Buttercream Frosting

Yield: 44 mini cupcakes

Adapted from Cake on the Brain's Best Ever Quinoa Cupcakes. These cupcakes are super moist, almost a bit too moist for my liking. (Hard to believe, I know.). The blackberry buttercream is adapted from a recipe from Sugar for the Brain.

Ingredients

    Chocolate Blackberry Cupcakes:
  • 2 cups cooked quinoa, cold (*see note)
  • 1/2 cup milk
  • 4 large eggs
  • 1 teaspoon vanilla
  • 1-1/2 cups sugar
  • 1 cup unsweetened cocoa powder
  • 1-1/2 teaspoon baking powder
  • 1/2 teaspoon baking soda
  • 1/2 teaspoon salt
  • 44 blackberries
  • Blackberry Buttercream
  • 4 large egg whites
  • 1 cup sugar
  • 3/4 pound butter, softened
  • pinch salt
  • 1/2 cup blackberries

Instructions

    For the Chocolate Blackberry Cupcakes:
  1. Preheat the oven to 350F. Line a mini muffin tin with paper liners. Drop 1 blackberry into each liner.
  2. In a blender or food processor, combine milk, eggs and vanilla and blend until combined. Add 2 cups of cold cooked quinoa (see below) and the melted butter. Blend until smooth.
  3. Add the sugar, cocoa, baking powder, baking soda and salt, and blend well to combine.
  4. Pour (if you're using a blender) or spoon out (if you're using a food processor) the batter into the cupcake liners. Fill them about 3/4 full. Bake the cupcakes for about 20 minutes, or until a cake tester inserted into the middle of a cupcake comes out clean.
  5. Let the cupcakes cool in the tin for 5 minutes, then remove them to a wire rack to cool completely. If desired, frost with blackberry buttercream.
  6. For the Blackberry Buttercream:
  7. Fill a medium saucepan 1/4 to 1/3 full with water and bring to a simmer.
  8. In the bowl of a stand mixer, add the egg whites and sugar. Place the bowl on top of the saucepan and whisk constantly until the temperature reaches 160F. If you don't have a candy thermometer, whisk until the sugar has completely dissolved and the egg whites are hot.
  9. Remove the egg white and sugar mixture from the heat and quickly move it to your stand mixer. With the whisk attachment, whip until the mixture is thick, glossy and cool, about 4-5 minutes. Scrape down the sides of the bowl and remove the whisk attachment.
  10. Using the paddle attachment, beat the mixture on medium speed. While the mixture is beating, add the softened butter one piece at a time and mix until all the butter is incorporated. Add the salt.
  11. Squish the blackberries in a fine mesh strainer over a bowl to extract the juice. Add to the buttercream and blend until smooth.

Notes

If you haven't got cooked quinoa on hand, make it first so it can cool before you add it to the cake batter: For 2 cups of cooked quinoa, rinse 2/3 cup raw quinoa. Place it in a heavy saucepan with 1 cup water and bring to a boil on medium-high heat. Cover, reduce heat to low and simmer for 15 minutes. Remove from heat and leave covered for another 10 minutes. Fluff with fork and allow the quinoa to cool completely. Quick Tip: If you're in a hurry, spread the cooked quinoa on a baking sheet and pop it into the fridge so it will cool faster.

3.1
Copyright 2011-2013 Ant & Anise

The Paleo Diet Challenge: Day 22

paleo diet challenge day 22 soda bread

It was another Paleo bread attempt today. And while it wasn’t a shout-from-the-rooftops success, it wasn’t nearly the disaster that the first one was. Perhaps I should feel comforted by that.

This time I set my sights a little lower, opting for an Irish soda bread that naturally has a denser texture than a bread you’d make for sandwiches. I have some good memories of soda bread, especially one my mom used to make from one of Anne Lindsay’s cookbooks. It makes good toast, that’s what I remember. I had my fingers crossed.

The recipe I was using calls for blanched almond flour, but all I had was almond meal (still waiting for my online delivery of blanched almond flour), so it was going to give me a denser result. And did it ever. Despite the baking soda the bread didn’t seem to rise, even a little. It stayed only a couple inches high, and reminded me of a rounded log of biscotti, ready to be cut and baked a second time in the oven.

Where I went wrong was thinking that sunflower seeds would be a nice addition, to give a welcome crunch. Big mistake. They did add a crunch, but they took on a greenish outline when baked. (Maybe they do all the time? I can’t remember the last time I made anything with sunflower seeds baked into it.) It made the bread look, well, almost a little creepy. It’s like the bread had gone moldy even before it had a chance to cool down.

Or maybe it was something that Martians would enjoy, if they were eating a Paleo diet.

It toasted up quite well, which I was most happy about. It didn’t bring all those happy Irish soda bread memories from my childhood flooding back, but it wasn’t too eggy and it didn’t crumble. If I closed my eyes and forgot about the green flecks in the bread, I enjoyed it quite well. With my morning coffee, it was almost like my breakfasts used to be.

paleo diet challenge day 22 soda bread

Print
Paleo Irish Soda Bread

Yield: 1 loaf

Adapted from Elana's Pantry.

Ingredients

  • 2-3/4 cups almond meal
  • 1/4 teaspoon kosher salt
  • 1-3/4 teaspoons baking soda
  • 1/2 cup pecans or raisins (or sunflower seeds if you want a Martian vibe)
  • 2 eggs
  • 2 tablespoons honey
  • 2 tablespoons apple cider vinegar

Instructions

  1. Preheat oven to 350F.
  2. In a stand mixing bowl, combine almond meal, salt, and baking soda. Add nuts or raisins and mix to combine.
  3. Add eggs, honey and vinegar to the bowl, and mix together until the dough has a uniform consistency.
  4. Place dough on a parchment- or silicon sheet-lined baking sheet. Form dough into a large, flat circle, about 8 inches around by 1-1/2 inches tall. Using a serrated knife, cut a cross about 1/2 inch deep in the top.
  5. Bake soda bread for 20-25 minutes, until it is golden brown. Remove and cool on a baking rack.
3.1
Copyright 2011-2013 Ant & Anise
3.2.2089


The Paleo Diet Challenge: Day 21

paleo diet challenge day 21

This challenge is a funny thing. For the past 3 weeks I seem to swing between two feelings: One is being energized and quite optimistic about finding a new way of eating, which might turn out to be better for me. (Is it a pathway to get off the daily Synthroid pill? Perhaps.) I really like the discovery of new ways to use ingredients that I never would have thought (like almonds as flour, cauliflower as rice), so there’s a certain adventurousness that I’m enjoying.

The other is spending a fair amount of time being frustrated about what’s allowed and what’s not. I like food a lot, obviously. But thinking about this Paleo diet almost constantly, how to make it interesting, working it into our daily lives without it being too much of a jolt, has been consuming way too much of my mental energy these days. Thinking about it is almost more challenging than actually doing it. Strange, hey?

(And, of course, there’s the still-unsuccessful quest for a decent Paleo bread. One that I can eat as toast, for breakfast. I thought I was losing my bread craving, and maybe after 30 days it will be curbed at least a little, but every so often it bubbles up and sends me on a new search for Paleo bread recipes.)

I’m thankful for the few times that I am able to eat out successfully, meaning I can order something that doesn’t need a lot of special instructions. Hold the bun! Can I get that wrapped in lettuce? Like you might expect, breakfast and brunch are a good time to eat out for Paleos, simply because eggs play a starring role. This Californian omelette from Milestones, with bacon, avocado salsa, diced tomatoes and cheddar, was a good example of a restaurant meal that didn’t need any strange requests, aside from skipping the toast. All I had to do was refrain from eating the potatoes. Whew.

More on the Paleo diet challenge:
Why I’m doing it in the first place
My plan for the 30 days

The Paleo Diet Challenge: Day 20

paleo diet challenge day 20

On days like this when so much is going on, like, for instance, working and battling with contractors, I wish that the Paleo way of eating didn’t still consume so much of my mental energy. (Sigh.)

One thing that’s been bugging me is that I haven’t really kept track of grocery receipts so far. There is a lot of talk on Paleo sites and blogs about how expensive it is to maintain this diet, where so much meat (preferably grass-fed, organic) and fresh produce (again, preferably organic) are involved.

I think it is a more expensive way to eat. I don’t have any hard evidence, really, more of a gut feel. But a couple of things stand out.

First, I am going to the store more often to pick up fresh ingredients, usually meat, eggs or fruit. (Thank goodness for the CSA or I’d be shopping for vegetables too.)

Also, we are not eating nearly the number of stir-frys and pastas for dinner that we used to. These are the kind of dinners where rice or noodles provide at least half (if not more) of the meal, with just a little meat and vegetables to round things out. They’re reliable, fast, and easy since we’ve made them so often. When you get home from the office at 6:30 or 7:00, they’re usually what we end up making. Oh right, aside from ordering pizza. Okay, I admit it.

So no, not very scientific observations here. And while we’re not eating rack of lamb every night, I’m curious about ways to make the Paleo diet less expensive. There are loads of resources on the web and, as you might expect, some are better than others. Here are three good ones I found so far:

  • Paleo Diet Lifestyle – 25 money saving tips for a Paleo diet
  • Paleo Diet and Living – Tips for Paleo on a budget
  • Whole 9 Life – Your guide to the grocery store


More on the Paleo diet challenge:
Why I’m doing it in the first place
My plan for the 30 days


Image courtesy of FreeDigitalPhotos.net.

The Paleo Diet Challenge: Day 19

paleo diet challenge day 19

I had been puzzling over what to do with the kohlrabi we got in our CSA box from Cropthorne Farm, and I finally figured it out. Little things like this make me happy. And having a weekly basket of fresh vegetables, which I don’t have to shop for, to get through the remainder of the Paleo diet challenge? Quite happy about that, too.

Kohlrabi isn’t something I would rush over and pick up at the store, ever. Which is why I applaud the CSA for bringing it to my attention. Well, now I do. In the last few days, I may have cursed once or twice thinking what am I supposed to do with this?

But, deep down, I believe it’s important to stretch your culinary boundaries and always keep trying new tastes. And so my search for a good recipe was on.

Roasting or steaming it didn’t seem too inspiring, especially considering the warmer weather lately. Slicing and eating it raw (with a dip) had some promise, but that would mean making a dip, an extra step that I didn’t need. When I stumbled upon a recipe for kohlrabi slaw that reminded me of a spicy Thai green papaya salad, I thought perfect.

And it was pretty close to perfect. It made very good use of the kohlrabi and it resulted in a very Paleo-friendly dish without me thinking about the Paleo part too much. Cool.

Print
Spicy Kohlrabi Slaw

Yield: 3 cups

Inspired by a recipe at Knit York City. This has a nice spicy kick from the chili garlic sauce, and paired well with grilled chicken and asparagus.

Ingredients

  • 2 medium kohlrabi, julienned
  • 2 tart apples, julienned
  • 3/4 cup carrots, shredded
  • 1/4 cup cilantro, chopped
  • 1 green onion, finely chopped
  • juice of 2 limes
  • 1 tablespoon Thai fish sauce
  • 1 tablespoon honey
  • 2 teaspoons sriracha or Asian chili-garlic sauce

Instructions

  1. Using a food processor or mandoline, shred or julienne the kohlrabi and apples, then shred the carrots. Place the shredded vegetables in a medium bowl, add the cilantro and green onion, and mix well to combine.
  2. In a small bowl, combine the lime juice, fish sauce, honey and garlic chili sauce together. Mix well, then pour over the vegetables and toss to coat.
  3. Taste and adjust for seasoning -- you might like it a little saltier (add fish sauce), more tangy (add lime juice), sweeter (add honey) or spicier (add chili garlic sauce). Or you may like it just as it is.
3.1
Copyright 2011-2013 Ant & Anise
3.2.2089


More on the Paleo diet challenge:
Why I’m doing it in the first place
My plan for the 30 days

  • 1
  • 2
  • 3
  • …
  • 5
  • Next Page »
  • Facebook
  • Instagram
  • Pinterest
  • Twitter

About Us

We’re Eve and Kris, an aunt and a niece. We love food. And while we have a lot in common in our approach, we also have our differences. So why not hash it out in a blog? Ant and Anise is a conversation about food in our lives, past and present. We like real food that doesn't take hours to prepare, but has something unexpected about it. It helps if it's pretty, too.

Subscribe to Ant & Anise!

Search

recent posts

  • Easy candied orange peel
  • Roasted kabocha squash dip
  • Squash and apple soup
  • Micro-Batch Blackberry-Lime Jam
  • Cauliflower Cheese Bake
  • Tarragon Pesto
  • Cheer for ginger cookies
  • White Bean Chili with Prawns

© Copyright 2014 Ant and Anise · All Rights Reserved · Built On The Genesis Framework · Powered By Wordpress


Loading Comments...