Ant & Anise

Simple, elegant, healthy food and a fondness for gluten- and grain-free recipes

Navigation
  • Home
  • Recipes

Carrot Apple Breakfast Cake

carrot apple breakfast cake

I’m on a quest to find a quick, nutritious breakfast.

Let me qualify that a little. There’s a few other criteria it has to meet, along with being fast and good for you: It has to have some protein in it, it needs to taste good alongside my morning coffee and, ideally, it should be free of gluten.

Seems simple enough, right? Well, not really.

On the breakfast-y protein front there’s eggs, cottage (or other) cheese and yogurt. I like eggs well enough, but I don’t want to eat them every day. I do like cottage cheese, especially with fruit, but it doesn’t match very well with my coffee. And yogurt? It’s never been my favorite texture, unless copious amounts of granola are mixed into it.

Fussy, I know…. 

Read More »

Oven dried apples and pears

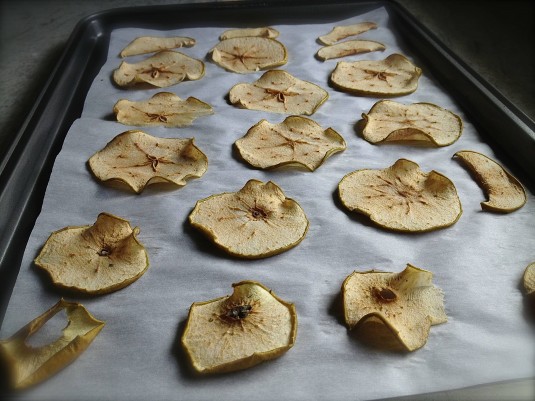
oven dried apple slices

When we were talking on Saturday, you mentioned that meditating for only a few minutes a day can help increase grey matter in your brain. I know it’s a good practice, but I’ve found it challenging to sustain it daily. Your comment got me thinking again.

First, that I will try, again, to build meditation into my day. Every day. (I started on Sunday morning with 7 minutes and am up to 10 already. Yay! This TEDx video is adding to my motivation.)

It also made me think that small investments in time can often yield benefits that endure. I thought of getting together with good friends, or exercising for just half an hour. Both of those make me feel better and last well beyond the actual time spent.

Oven drying apples and pears is the same: A little effort goes a long way and gives a generous result. (Rather like the slow roasted tomatoes you introduced me to.)

oven dried pear slices

The oven drying takes just under an hour, plus a few more hours to completely dry. Mostly it’s not active time, just a matter of being around so you can keep an eye on the fruit slices while they’re in the oven.

And what you get are compact slices of amped-up apple and pear, concentrated flavor in a sweet, chewy bite. Delish.

They can be used a number of ways. So far I’ve tossed them on top of green salads and stirred them into hot cereal. (The cereal was particularly good.) They would jazz up a cheese plate, particularly if a cambozola or roquefort were involved. And I bet they would be heavenly dipped in some dark chocolate. Oh yes, dried pear and chocolate. Now that’s a thought I can meditate on.

pear and apple slices

Recipe Tip: You’ll find a number of techniques for drying pears and apples – like soaking the fruit in water with lemon juice added, using a greased pan or oiled oven rack to place the fruit on. What I found worked best is an extremely simple approach, with no oil or lemon involved. Here are my suggestions:

  • Use firm fruit. It’s easier to get the slices thin and produced a better (drier) result. I used a Granny Smith apple and both Bartlett and Bosc pears.
  • If your slices are thin enough, you won’t need to brush them with lemon juice or soak in a water/lemon juice solution. (I brushed half of the pear slices with lemon juice but couldn’t see any difference with the plain ones once they were dried.)
  • Unless you’re particularly seed averse, don’t bother coring the fruit. Leaving the seeds in is easier, and they look quite pretty.
  • Use parchment-lined baking sheets, and place the slices directly on the parchment – no oil required.

oven dried apple slices

Print
Oven dried apples and pears

Ingredients

  • 1 crisp apple and 1 firm pear

Instructions

  1. Preheat oven to 200°F. Line a large baking sheet with parchment paper.
  2. Slice the apple and pear crosswise into thin slices, about 1/8” thick. If you have a mandoline this is a good time to enlist it. If you don’t (or if it’s in storage like mine is) use a sharp chef’s knife.
  3. Place the slices evenly on the parchment-lined baking sheet and place in the oven. Let the slices dry for about 45-60 minutes. It’s a good idea to check them at the 45-minute mark, as the thinner slices will start to get toasty brown then.
  4. Remove the baking sheets from the oven and let them cool for 5-10 minutes. Carefully peel the slices from the parchment, and transfer to a cooling rack to finish drying. This may take a few hours. Store in an airtight container for up to a week.
3.1
Copyright 2011-2013 Ant & Anise


Parsnip hummus

parnips for parsnip hummus

Do you like parsnips?

Ummm…well, I don’t dislike them. But I don’t go out my way to find them either. I guess I appreciate them more than I used to. Does that count as a yes?

When I was growing up parsnips didn’t make their way into too many of our dinners. As in, almost never, at least on the Johnson side. (Eve, can you think of a time?)

No, we stuck to the basic root vegetables: carrots, sometimes rutabaga (which we called turnips, but were really yellow-fleshed rutabaga), and potatoes. Especially potatoes. A never-ending rotation of mashed, boiled, baked, and, for special occasions, scalloped. And then more mashed ones again.

On the Neely side of the family, parsnips turned up only once every few years, around Christmas. At my cousins’ place my aunt Glennys made candied parsnips, with heaps of brown sugar and butter to make them more appealing to everyone, especially the kids. I knew my sweets though, and the candied parsnips didn’t have me fooled. When the parsnips got passed around the table to me I remember taking a token one or two small pieces, just to be polite.

Enter the CSA. This was our second summer enjoying a weekly box of fresh vegetables from Cropthorne Farm in Ladner, and I love it. Well, mostly I do. It’s exciting to see the season unfold week by week and to try veggies I don’t normally buy.

But every season, there’s a few weeks where my culinary creativity sinks to a low ebb. Maybe it goes on summer holiday. At those times, when I open up the weekly box and see something I don’t regularly eat — like kohlrabi or parsnips — I’m apt to shove it to the back of the crisper, thinking what am I ever going to do with that?

That’s exactly how I felt when we got parsnips 3 weeks in a row in the CSA box. I secretly hoped that Bob would discover them in the fridge and roast them all up for a big Sunday night dinner à la Jamie Oliver.

No such luck.

So I took up a challenge for myself: Find some inspiration, somewhere, and make a respectable dish out of the parsnips. Not a boring side dish you’ve seen before (boiled or roasted parsnips), and not a slavishly strange creation you’ll never see again (Heston Blumenthal’s parsnip cereal). More like a simple, slightly offbeat dish that would appeal to almost everyone over 12 years old.

How about parsnip hummus?

Yes, parsnip hummus. An earthy, thick spread of cooked parsnips, tahini, garlic and spices. Some lemon juice and zest for brightness, and a little olive oil and melted butter for a velvety mouthfeel. The texture is like hummus but lighter, a little sweeter and spicier than one made with chickpeas. (And Eve, everyone happily enjoyed more than a token amount at your dinner party. I’ll take that as two thumbs up.)

parsnip hummus

Print
Parsnip Hummus

This is a fantastic way to use parsnips in an unexpected way. It's a healthy, gluten- and grain-free appetizer that pairs well with raw veggies or crackers. Plus, you can make it a day ahead of time.

Ingredients

  • 1 lb parsnips, peeled and cut into 2-inch thick pieces
  • 2 cloves garlic, finely chopped
  • juice + zest of 1 lemon
  • 1 tablespoon ground cumin, toasted (*see note)
  • 1 teaspoon ground coriander, toasted (*see note)
  • 1/4 teaspoon ground cloves, toasted (*see note)
  • 1 tablespoon olive oil
  • 2 tablespoons unsalted butter, melted
  • salt and pepper to taste
  • olive oil for drizzling (optional)
  • fresh vegetables, crackers or bread for dipping

Instructions

  1. Place the parsnip pieces in a medium saucepan and cover with water. Bring to a boil and simmer over medium-low heat until parsnips are tender, about 5 minutes. Drain and transfer to food processor.
  2. Add lemon zest and juice, spices, and olive oil and blend together until smooth. Scrape down the sides of the processor, add the butter and blend together again. Add salt and pepper to taste. If the texture is thicker than you prefer, add a little more olive oil or lemon juice. If not using right away, cover and refrigerate.
  3. To serve, spoon hummus into a ramekin or onto a plate, drizzle with some olive oil if desired, and surround with slices of fresh vegetables, crackers or bread. Makes about 1-1/2 cups.

Notes

Toasting and grinding your spices helps to boost their flavor: Heat spices in a dry sauté pan over medium-low heat, stirring occasionally with a wooden spoon, until fragrant. (Keep a very close eye on your pan, as the spices go from fragrant to burnt in no time!) Remove from heat, cool, then grind in a spice grinder. I use an inexpensive coffee grinder which I use exclusively for spices.

3.1
Copyright 2011-2013 Ant & Anise


parnips for parsnip hummus

The Paleo Diet Challenge: Top 5 Positives

prawn avocado salad paleo diet challenge top 5 positives

At the start of the Paleo diet challenge, I was looking to test three things: First, if I could actually stick to a grain-free diet for a whole month. Second, if it would make me feel any different (more energy, perhaps?). And third, if it would make any difference in my usual blood test results for TSH, which impact the amount of thyroid supplement I take every day because of my Hashimoto’s.

I’m happy to report that the answers are yes, yes, and yes. Three for three!

I stayed true to my month-long challenge of eating a Paleo diet, specifically avoiding any grains like rice, corn or (the big one) wheat. It wasn’t always easy, but feel proud that I stuck it out to the very end. Now that I’ve had a few days to think about the experience, along with the most challenging parts, here are the top 5 positives:

1. I feel better.
I don’t feel dramatically different, unlike so many stories I read about life-changing results after trying a Paleo diet. For me, feeling better is more subtle and nebulous but I’ve noticed a definite difference. I feel lighter, even though the scale doesn’t reflect that. I also feel healthier.

2. It opened my eyes to new ingredients.
Before the challenge I was blissfully unaware of several Paleo-friendly ingredients, like coconut flour and almond flour, to use in baking. In particular, blanched almond flour rocks, and it is something I’ll be using regularly.

3. It increased my creativity in the kitchen.
It’s easy to fall back on tried and true dishes. In my case, this means answering the what’s-for-dinner question with a pasta or a stir-fry with noodles. Both of these are good, but they’re also kind of boring. With grains off-limits I was forced to get more creative, which was refreshing for the most part.

The three twists I particularly enjoyed were using cauliflower for ‘rice’ (or, when I got a little carried away with it in the food processor, ‘couscous’), using lettuce and cabbage as convenient wraps (fish tacos, Thai beef wraps), and using eggplant as a flatbread.

4. It made me more thoughtful about what I was eating.
I’m fairly aware of what I eat anyway, but the challenge made my food radar (my foodar?) razor sharp. My label reading became even more serious, as I looked for traces of wheat or peanuts that lurk in foods like soy sauce or other prepared foods, albeit in small amounts.

5. It did have an impact on my TSH level.
Now this is exciting: I had a blood test done a few days ago, which showed the level of TSH in my blood had dropped from 1.8 to 0.8. This is a good thing, as it means my body is absorbing the Synthroid more effectively. It’s not enough of a reduction to warrant a change in dosage (the normal reference range for TSH is wide, from 0.3 to 5.0), but it’s a step in the right direction.


So is it possible to reverse my Hashimoto’s Thyroiditis with a Paleo diet?

Not in 31 days, in my case. I’m encouraged by the blood test result, though. For now, I’m saying goodbye to the Paleo diet but will aim to stay gluten-free, since the more reading I do the more research I find that connects gluten consumption to autoimmune diseases like Hashimoto’s. I will retake the blood test in a few months to see if there’s been any further change in my TSH levels, and will keep you posted with what I find.

That wraps it up the Paleo diet challenge. It’s been an interesting journey, and I’ve hoped you have enjoyed reading about it and trying some of the recipes.


prosciutto wrapped melon paleo diet challenge


More on the Paleo diet challenge:
Why I’m doing it in the first place
My plan for the 30 days

The Paleo Diet Challenge: Top 5 Negatives

paleo diet challenge finish

Wow, it’s over. 31 days of the Paleo challenge done. Whew.

It’s taken me a few days to gather my thoughts on how the last month went and what I learned. There were a lot of positives — more than I thought there would be, actually — but first, let’s start off with the things that didn’t go so smoothly. The things that were, well, the most challenging about the challenge. Here goes:

1. Grain-free items are difficult to find.
In Vancouver we celebrate fresh, quality food and have access to a wide range of ingredients. I found it really disappointing to find a dearth of grain-free choices in our grocery stores. And I mean stores like Whole Foods and Choices. Grain-free crackers? Forget it. Grain-free pasta? Um, no. Gluten free, sure. Grain free, no way.

2. Restaurants are minefields.
If you deviate from the salad section, it’s a safe bet that you’ll run into grains pretty fast. Wheat is everywhere. Some restaurants are accommodating when it comes to adapting dishes (like having a lettuce wrap instead of a hamburger bun) but many aren’t so friendly when you’re “that girl” with all the questions and special requests.

3. Making everything from scratch, day after day, is tiring.
I expended a significant amount of energy thinking about meals. What can I have? What’s off limits? All this thinking and planning meals within the Paleo boundaries made me a more anxious than usual. I was very grateful on the rare occasions when we could just eat leftovers.

4. I like eggs, but not that much.
Switching my well-entrenched morning routine from peanut butter toast to eggs wasn’t very smooth. I liked the egg recipes I tried, especially the eggs in ham cups, but the thought of eating eggs almost every morning didn’t appeal to me, not in the least.

5. My craving for bread is difficult to shake.
I do feel healthier eating a Paleo diet, and I think that’s largely due to not eating so much bread. But at the same time, I still crave a dense, multigrain bread and my chewy pizza crust. (Oh, that pizza…!) I thought the lack of bread was going to be the biggest hurdle for me in the challenge, and it turned out to be true. And despite my hopes of finding a Paleo bread recipe to quell my craving, I didn’t find a really good one during the 31 days. (I still need to try this recipe from Paleo Effect, which looks very, very promising.)


But it’s not all doom and gloom. To end this series, I’ve come up with the top 5 positives of the challenge and my thoughts on moving forward.


More on the Paleo diet challenge:
Why I’m doing it in the first place
My plan for the 30 days


Finish line photo courtesy of jayneandd via Flickr Creative Commons.

The Paleo Diet Challenge: Day 31

paleo biscuits paleo diet challenge day 31

Final day of the challenge. Big sigh.

(Okay, I suppose technically it was a 30-day challenge…but with July having 31 days, it didn’t make sense to me to not make it through the entire month.)

It’s been up and down for the last few weeks — my feelings about Paleo eating, my weight, my anxiety levels about what to do for dinner (not the big questions in life, I realize) — and I’m glad the challenge coming to an end. There are a number of positives I’ll take away, no question.

But today, the last day, it’s about my quest for making a Paleo-friendly bread, something that has eluded me so far.

I wish I could say that, after trying a number of recipes and combinations of Paleo-friendly flour substitutes this month, I found a killer recipe. A Paleo bread that I could toast up and enjoy, if not with peanut butter then with another nut butter, to make it like the pre-challenge breakfasts I used to have. Yeah!

The recipe I settled on was for Paleo biscuits, and overall it was pretty decent. The biscuits were moist and had a good crumb, and they toasted up quite well. Score! (They did stick miserably in the muffin cups though, despite being well greased. I had to chisel them out with a knife, which was not fun. Arg).

I toasted one up and topped it with almond-cashew butter. Morning coffee at my side, I had high hopes that this biscuit would be the one to replace my beloved (wheat) toast.

Another big sigh. Turns out it was just not meant to be. It’s not that I didn’t like the Paleo biscuits. It’s that they weren’t amazingly good, either.

As a former baker and lifelong pastry maker (and eater), I realize I’ve set the bar for good bread fairly high. That doesn’t mean that it’s not possible to make a great Paleo bread, just that I haven’t found the right recipe. But I like a challenge, obviously. On the Paleo bread front, we’re not done yet.

paleo biscuits almond cashew butter paleo diet challenge day 31

With the challenge coming to a close, I’m going to take a few days and gather my thoughts on what I thought of it all, the good and the bad. Stay tuned.
More on the Paleo diet challenge:
Why I’m doing it in the first place
My plan for the 30 days

  • « Previous Page
  • 1
  • 2
  • 3
  • 4
  • …
  • 8
  • Next Page »
  • Facebook
  • Instagram
  • Pinterest
  • Twitter

About Us

We’re Eve and Kris, an aunt and a niece. We love food. And while we have a lot in common in our approach, we also have our differences. So why not hash it out in a blog? Ant and Anise is a conversation about food in our lives, past and present. We like real food that doesn't take hours to prepare, but has something unexpected about it. It helps if it's pretty, too.

Subscribe to Ant & Anise!

Search

recent posts

  • Easy candied orange peel
  • Roasted kabocha squash dip
  • Squash and apple soup
  • Micro-Batch Blackberry-Lime Jam
  • Cauliflower Cheese Bake
  • Tarragon Pesto
  • Cheer for ginger cookies
  • White Bean Chili with Prawns

© Copyright 2014 Ant and Anise · All Rights Reserved · Built On The Genesis Framework · Powered By Wordpress


Loading Comments...